 RandKL's
GI Joe Modeling Page
Packs and Frames
An easy but relatively time-consuming project that can really give a figure a "finished" look. Nothing says "well-outfitted figure" more than a good contemporary pack on his back.
It *can* take a few hours to get it right of course, but the end result is always worth the effort put into it!
This one should be used as a general "guide" and not as an actual construction article since custom fitting and final adjustments will have to be made by you. All measurements given should be considered as approximates....and the diagrams are NOT to scale.
Let's start off with a comparison of the different types of packs used throughout history and then we can go from there.
The earliest known load bearing equipment that could really be called a "pack" is buried too far back in history to ever really be pinned down. We certainly know that Roman soldiers were often issued a leather knapsack (frameless pack) and that Egyptians from as far back as 2000BC commonly used woven rush/reed baskets worn on the back. We can even date the use of a rudimentary pack frame to approximately 3300BC based on the preserved body of a man found in the Alps who carried a small wooden framed animal hide pack.
Incidentally, he also carried a fanny pack.
Crusaders often carried extra provisions and gear in a "habersack" (haversack which literally means "oatsack") that could be worn over one shoulder or tossed over the back of a horse. Even though it's one of the earliest known examples of load bearing equipment technology, the same concept was still widely used as recently as the American Civil War in which troops commonly carried personal possessions rolled up in a blanket and worn over one shoulder. Sailors often carried their gear rolled up in their hammock and worn over one shoulder in the same way.
We do know that early pack technology was based to a large degree on commonly available materials. Tools and equipment manufacturing, until recently, always was. Based on that fact, we can assume that a type of pack may have been known and used in the time period we want to recreate by looking at commonly available materials.
That's called "contemporary resource extrapolation", and means that if you can recreate the resources used at that time, any logical uses of those resources that you can think of were most likely used during that time as well.
It most definitely wouldn't be a good idea to put a wool pack/wooden frame on say, an Egyptian warrior figure....nor a metal framed multi-pocket pack on a Roman. Wool and wood were simply too scarce for the Egyptians to use them in something as mundane as load carrying....the same for suitable metals for a frame-pack for a Roman.
We can assume that the commonly available materials would have allowed a European from circa 1AD to modern times to own and wear a woven cloth pack as well as an animal hide one....and even the use of a wooden frame could be accurate.
The most basic aspect to recreating "period" artifacts and equipment is to always look at what that particular time frame and location had to work with. Match the resources they would have had, and chances are great that you'll match the item as well. That's contemporary resource extrapolation.
(While all of our projects including this one are to a great degree "western" technology based, most of the general rules do apply to other societies.)
Until relatively recent times, the construction and design of a pack seems to have been to a large degree simply a matter of personal design choice and necessity. Common designs and mass production are certainly modern improvements.
Metal frames, internal frames, modern materials, and ergonomic padding are certainly modern ideas so be careful when you try to use those in any but a modern figure.
Since the "habersack" design does date so far back and is so simple in design, let's start off with that one.
The basic design is so simple that all you need to recreate it is a 12x12 inch square of fabric and a short length of twine or yarn.
The square of fabric recreates the blanket the figure would have carried so choose your colors based on contemporary examples.
Craft felt cloth from your local hobby/craft store or Wallyworld is a good material to use since it can recreate many different types of "look" in the finished project. Buy the thinnest craft felt you can and select neutral earthtone colors for best results. It can sometimes be dyed with RIT types of dyes, but often needs to be sprayed with an airbrush to really achieve the proper shades. Heavy, tight-woven cotton linen is good, as is lightweight cotton canvas.
Tip: Always remember the old axiom that "nature abhors a vacuum". What exactly does that mean in relation to modeling? Well, basically, if it's empty....fill it! In this case, if you use a single color square of fabric your completed habersack will be one color as well. Certainly period in some regards but usually just boring. You can add detail and a much better "look" by something as simple as airbrushing one accenting color stripe down one blanket edge to give the completed habersack a flash of color.
The basic layout is more of a method of packing the habersack than it is a construction article since the basic blanket design wasn't usually cut or sewn to make it.
To recreate a Viking or medieval type habersack, we simply lay the 12x12 inch cloth out flat and fold it as in this picture. All folds are to the inside.

The small corners in the upper left and lower right, you can place a contemporary item such as a cup or even a small stone under the fold....those serve as anchors for the rope tied on later.
The larger fold in the upper right, you begin rolling down to the lower left as in this pic. Clothing and other relatively flat items can be simply rolled up in the blanket as you form the habersack.

Keep rolling the blanket until the two small items you placed in the corners are rolled up good and snug.
Once you get it rolled to the small corners, you simply tie your "rope" tight around both ends and adjust it on the figure until it hangs just right.
In use, smaller or more used items (food, canteen and such) were pushed down into the folded/rolled blanket and the last loose corner was left as the flap of the habersack. The sack was then hung from one shoulder by the rope so that it hung at hip level.
As an alternative to tying knots of your "rope" on the corners, you can measure a length of twine and put a basic "eye" splice on both ends. Both knotted and spliced ropes are contemporary to all ages when the habersack was used.
The next improvement to the basic habersack design was simply a "specific use" crescent-shaped bag that consisted of two flat crescents of cloth sewn together that recreated the look and wear of the rolled blanket design. It could still be slung from one shoulder and thrown over the back of a horse, but it was specifically designed as a piece of load-bearing equipment.
The next design and step upward would be a generic "two-panel sack" type of pack. Along the lines of a modern "haversack" design. We can easily do this one with a 4x8 inch strip of cloth or leather and simply fold it over and sew the two edges. Leave one end longer to serve as a flap and tie or sew a length of twine or a strap to both sides.

The next improvment would be a "four-panel sack"....fold the 4x8 inch strip exactly as before but sew two narrow strips onto it for the sides of the sack.
Another common variation is the "tube sack". Made up of a single strip of fabric with the ends sewn to form a tube (imagine a papertowel roll) with a bottom panel sewn on.
All three sack-type packs were used extensively throughout history in Europe and America. The design is so generic that it's pretty much universal in its use even today.
The next pack type we'll work on is an improved "sack-type" pack. It's a very basic design that succeeds in advancing the pack concept to a more "specific use" level in that it no longer relies on a blanket or a generic sack.
This type of pack is pretty much as old as the habersack and generic sack designs, though it obviously follows them both in technology due to the extra construction steps involved. Even though it can be dated back to approximately 1AD (Pliny described one in his writings), common use of it seems to begin in the late 16th to early 17th century.
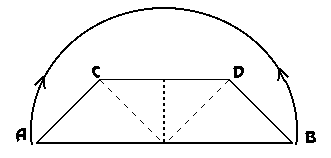
We start off with an 8x8 inch square of cloth and fold two corners to the middle. Cut both those corners off at the fold lines to leave a lozenge-shaped piece of cloth.

Next, we fold the lozenge diagonally from corner to corner and sew a single line of stitching across that doubled cloth right in the middle.

The next step is the most complicated....it'll take you all of two minutes to do.
The two corners at C and D in the following diagram, spread outwards and crease on the dotted line....corner A and B, fold upward until they meet.
Run a single row of stitching up both edges to sew both C's and D's together and tie your usual twine "rope" or sew on a strap and you're done.
With the two flaps folded over it forms a triangular shaped sack with four seperate interior compartments.

This type of pack was used extensively throughout Europe from about 1600AD and even to the new world. It was widely issued to both French and English troops as well as Americans during the Revolutionary War. The same basic design was even used by French resistance fighters during WW2, though with a slightly altered sewing pattern to give a rectangular shape to the finished pack as opposed to the triangle.
To construct a rectangular form of this sack to recreate a WW1 breadbag, or a map case, or a generic haversack we start off with a strip of fabric 8 1/2 inches long by 3 1/2 inches wide and hem the top edge toward us as in this diagram. The shaded area shows the completed size and shape of the bag.

The 8 1/2x3 1/2 inch strip will produce a 2x3 inch sack that would be 12x18 inches in fullscale. You can adjust your sizes to fit the sack you want to recreate....just remember to multiply your width measurement by 4 to give you the width of your strip. As an example if you wanted a 12inch wide by 24inch long fullscale sack, in 1/6 scale that would be 2x4 inches. Multiply 2x4 and you'll need an 8x4 inch strip of fabric....add on 1/2 inch for seam width and you'll need to cut an 8 1/2 inch x 4 1/2 inch strip.
Now that you're properly confused, let's get back to sewing. :)
With the top edge hemmed, you now fold that strip of cloth directly in the middle and sew the ends together with a single row of stitching.

Now turn it right-side-out and refold that band of fabric so that end seam is now just to one side of the middle and sew a single line of stitching right down the middle as you did for the triangular version earlier.

Do the X fold as you did on the version earlier....fold the lower edge and sew directly across the bottom and up both sides....sew on a flap and strap and you're done.
For WW1 breadbags and such, you'll want to make the entire bag from cloth. For a map case or WW2 haversack you might consider a leather flap depending on the specific bag you want to recreate. In all cases, metal rivets and grommets will add necessary detail and add to the overall "authentic" flavor of the sack.
The common multi-pocket type of pack in use by most militaries around the world, as well as many civilian designs based on the idea, are often referred to as "swiss packs". The name originates from a Swiss design for a simple wooden-framed sack-type of pack that had two exterior pockets sewn on. That design was in common use by the Swiss as early as 1860 but the design really became a standard in post WW1 armies.

The German mountain pack during WW2, as well as the modern U.S. ALICE pack are based directly on it.
The basic design is a four panel or tube sack with two exterior pockets sewn onto the sides. Let's assume you're going to build the four panel.
We start off with a 4x14 inch (approximate) strip of cloth and add a layer of doubling as in this diagram. You can sew in another layer of the same cloth or use a 4x5 inch piece of iron-on basting material. The choice is yours.

Next, hem the ends of the strip to about 1/4 inch as in that same diagram.
This diagram shows where to place your straps/strings so that upon sewing the sack and turning it right-side-out, you have shoulder straps or attachments for the frame.

This design was used on several different era packs including Viking/medieval, Napoleonic, and American Civil War periods.
A more modern example would be to sew a strip of doubled fabric onto the sack to form the upper frame attachment.

This design was used on several packs from WW1 to present date including the German mountain pack (WW2), the ALICE pack, the Swiss and Italian military issue packs and many modern civilian packs.
When sewn in and the pack is turned right-side-out, it gives a reinforced strip underwhich the upper part of the frame could be inserted. An option would be to triple or quadruple the thickness of the fabric strip to replicate the padding on the ALICE pack.
When folded, it'll look like this side view diagram.

To this, we sew two 1 1/2x5 1/2 inch strips to make the side panels. You're leaving 1/4 inch seams for strength so the edges don't fray. Be sure to leave the top flap loose of course.
Now turn that right side out and you have a simple four panel sack pack with either shoulder straps or frame ties.
For the two side pockets, we cut two pieces of cloth as in this diagram....fold them and sew them exactly like the four panel sack you just did and they form two four sided pockets with "boxed" flaps.

Sew those onto the side panels of the pack and sew on your straps and your favorite type of closures and you're done on this one.
That's a basic "swiss pack" design that can be built on to make a *lot* of variations.
Frames:
The earliest item that can reasonably be identified as a "pack frame" is from the Iceman (mentioned earlier) found in the Alps.
He carried a quiver with a dozen hand-made arrows inside....but he also carried at least three more arrow-like sticks of wood found outside his quiver that were roughly lashed together to form an X shape that was lashed to the pack found with him.
Though we can't be positive that it was a pack frame, we can infer from the design that it was more likely to be a frame than simply "tied-together arrows".
We can recreate this basic design by simply tying some sticks with cotton craft string and tying it to a generic two or four panel sack. The design can be done with or without side rails....both are accurate.

A common military design based on the X frame uses thin metal strips for the frame that allows for flex and load cushioning.
To do this one, you'll need a four panel pack done in the swiss pattern with the upper band frame attachment as we did earlier.
To make the frame, we'll need a small piece of 3/4 inch steel pallet strapping (available free in any store or manufacturing plant....just ask for a piece from any stockboy) Using some good quality tin snips, cut the piece into 1/4 x 3 inch lengths....you'll need three of them. You'll also need one piece of full 3/4 inch wide x 2 inch long strapping.
Be extra careful while cutting them because the edges will be razor-sharp and no project is worth a bad gash!
Use a file and sandpaper to smooth the edges down so no one will cut themselves later.
Next, we carefully drill holes through two of the narrow pieces approximately 1 inch from one end, and 1/8 inch from both ends. On the single 3/4 x 2 piece you have, drill one hole 1/8 inch from both ends. The third/last narrow piece you cut, lay it to the side for later. You'll need to custom fit it to the frame so don't bother with it now.

Now use craftpin rivets or small grommets to pin the two narrow ones together to form an uneven X shape....the large legs will be at the bottom. Use craftpin rivets or grommets to pin the 3/4 inch wide piece onto the two longer legs and then fit the last narrow strip you have across the top, short legs of the X. Drill it exactly like you did the others and trim the ends off once you get it fit. Notice the two horizontal bands are on top of the X.
Diagram is NOT to scale!

To be continued....